


Getting Started
This page describes how to get your new Gumstix up and running. It is based on the Verdex and Verdex Pro boards.
Power and Serial Cables
Before you can do anything with a Gumstix motherboard, you'll need a power and serial cable. The details below will help you to build these. You will need:
| Part | Details | Farnell Code |
|---|---|---|
| Power Jack | Diameter, External:2.35mm, hole:0.7mm | 121 6982 |
| Twin Core | Power Cable | - |
| Mini 8 DIN (male) | Serial Connector (Gumstix) | 152 210 |
| 9 Pin D (female) | Serial Connector (PC) | - |
| 2 core screened | Serial Cable | - |
Power
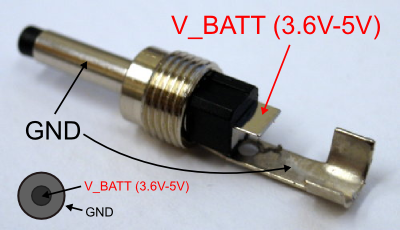
Gumstix Power Connections
Power is supplied via a power header on a connected expansion header. The
net powered is called V_BATT. This is then regulated down to 3.3V. The photo
shows how a power connector is connected. Double check the connections in case
the pins on your connector vary to those shown.
Serial
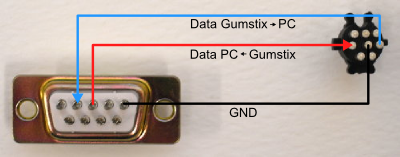
Gumstix Serial Connections
The connections for the serial cable are shown here. The photo shows the backs (solder bucket side) of the two connectors.
Boot Test
Before you power up your board up, you'll want to connect up the Gumstix serial port to your computer and have something listening for incoming data.
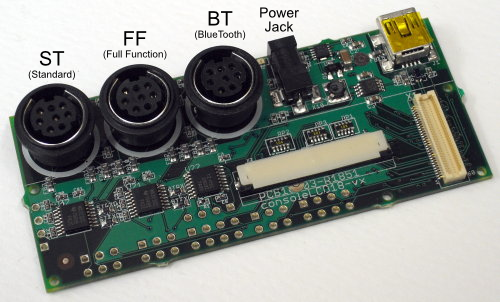
Gumstix Console and LCD Module |
Connections for Gumstix Boot |
Connect the serial cable to the Full Function serial port. To output the serial data
sent from the Gumstix to a terminal on your PC use the following commands:
> stty -F /dev/ttyS0 115200 -icrnl
> cat /dev/ttyS0
The first command configures the serial port. It sets the Baud rate (speed)
and how it deals with newline characters. The second command simply echos data
coming in to the serial port to the terminal. Note that /dev/ttyS0 is the
name of the serial port on your PC.
Now connect the power cable to one of the Gumstix expansion boards and switch on. You should hopefully see something like the text below (Only the first few lines are shown here).
U-boot 1.2.0 (May 10 2008 - 21:22:03) - PXA270@600 MHz - 1604

*** Welcome to Gumstix ***

DRAM:  128 MB
Flash: 32 MB
Using default environment

Hit any key to stop autoboot:  0
Instruction Cache is ON
Copying kernel to 0xa2000000 from 0x01f00000 (length 0x00100000)...done
## Booting image at a2000000 ...
Image Name:   Angstrom/2.6.21/gumstix-custom-v
Image Type:   ARM Linux Kernel Image (uncompressed)
Data Size:    1030044 Bytes = 1005.9 kB
Load Address: a0008000
Entry Point:  a0008000
OK

Starting kernel ...
Logging In
The previous section is a quick and easy test to make sure everything is working, but doesn't allow you to log in to your booted Gumstix. You'll need a terminal emulator like Minicom, it will allow you to login and setup your Gumstix.
Unfortunately, due to the flexibility of Minicom it's not the easiest thing to use. Luckily there are not many options that need setting.
Minicom Setup
Start Minicom in setup mode using the command below. Then go through the menu and alter the
Serial port setup and the Screen and keyboard options.
> minicom -s
+-----[configuration]------+
| Filenames and paths      |
| File transfer protocols  |
| Serial port setup        |
| Modem and dialing        |
| Screen and keyboard      |
| Save setup as dfl        |
| Save setup as..          |
| Exit                     |
+--------------------------+o
+-----------------------------------------------------------------------+
| A -    Serial Device      : /dev/ttyS0                                |
| B - Lockfile Location     : /var/lock                                 |
| C -   Callin Program      :                                           |
| D -  Callout Program      :                                           |
| E -    Bps/Par/Bits       : 115200 8N1                                |
| F - Hardware Flow Control : No                                        |
| G - Software Flow Control : No                                        |
|                                                                       |
|    Change which setting?                                              |
+-----------------------------------------------------------------------+
+-----------------[Screen and keyboard]-----------------+
|                                                       |
| A - Command key is         : ^A                       |
| B - Backspace key sends    : BS                       |
| C - Status line is         : enabled                  |
| D - Alarm sound            : Yes                      |
| E - Foreground Color (menu): WHITE                    |
| F - Background Color (menu): BLACK                    |
| G - Foreground Color (term): WHITE                    |
| H - Background Color (term): BLACK                    |
| I - Foreground Color (stat): WHITE                    |
| J - Background Color (stat): BLACK                    |
| K - History Buffer Size    : 2000                     |
| L - Macros file            : .macros                  |
| M - Edit Macros                                       |
| N - Macros enabled         : Yes                      |
| O - Character conversion   :                          |
| P - Add linefeed           : No                       |
| Q - Local echo             : No                       |
|  Change which setting?  (Esc to exit)                 |
+-------------------------------------------------------+
Finally select the Save setup as dfl option to save your settings as the default.
Booting and login
Now you're ready to go, start Minicom using the command below and then switch on the Gumstix.
> minicom -o
It can take quite a while before you reach a prompt as the kernel is trying
to determine what hardware you have (you can speed this up later). Log in using
username root and password gumstix.
To save this hassle, the next thing you'll want to do is setup the network, so you can ssh into the Gumstix instead.
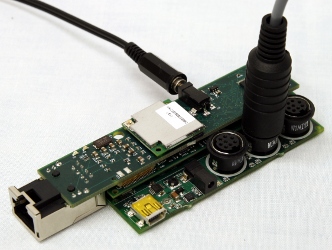
Networking
The NetWifiMicroSD expansion card provides both wireless and wired
ethernet connections. The card is shown below.
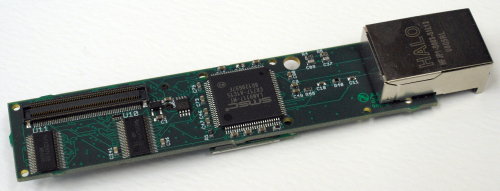
Gumstix Network and Wi-Fi Module
To use a static IP address you'll need to edit the
/etc/network/interfaces file.
/etc/network/interfacesauto eth0 iface eth0 inet static address 192.168.1.72 netmask 255.255.255.0 gateway 192.168.1.10
You can change the host name of your Gumstix by editing the /etc/hostname file.
/etc/hostnamerobot6
Reboot your Gumstix and once the network is up and running, you should be able to ssh in. Connecting via ssh means you can do away with the serial connection.
Speeding up Boot Time
As mentioned earlier, booting can be slowed down quite a lot by the loading of kernel modules and services. The
update-rc.d allows you to manage these. The example below shows how to disable Bluetooth.
> update-rc.d -n -f bluetooth remove
update-rc.d: /etc/init.d/bluetooth exists during rc.d purge (continuing)
Removing any system startup links for bluetooth ...
/etc/rc0.d/K19bluetooth
/etc/rc1.d/K19bluetooth
/etc/rc2.d/S23bluetooth
/etc/rc3.d/S23bluetooth
/etc/rc4.d/S23bluetooth
/etc/rc5.d/S23bluetooth
/etc/rc6.d/K19bluetooth
Other services are listed in the table below. For a basic setup you can probably disable
boa, bonjour, ntpd, ntpdate, alsa-state.
| Service Name | Description | Web site |
|---|---|---|
dropbear |
SSH 2 server and client | http://matt.ucc.asn.au/dropbear/dropbear.html |
boa |
Web server | http://www.boa.org |
bonjour |
automatic discovery of computers, devices, and services on IP networks | http://developer.apple.com/networking/bonjour/index.html |
ntpd & ntpdate |
Network Time Protocol daemon and setting tools | |
alsa |
Advanced Linux Sounds Architecture | http://www.alsa-project.org |
