


Blob Detection
This page describes an algorithm for performing blob detection in monochrome images. A Java code demo is provided, however, the core algorithm is easily ported to other languages. If you are in a hurry, jump to the code.
Labelling
The overall goal is to label each pixel within a blob with the same label number. The first stage in achieving this is to iterate through all the pixels, checking the label number of neighbouring pixels as you go. The image below shows the labelling kernel and how it is applied.
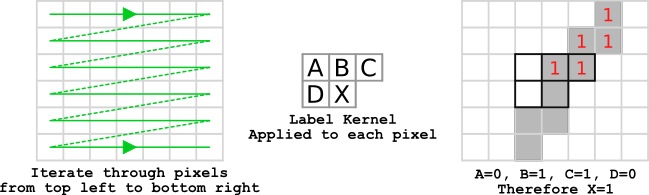
Pixel Labelling Process
A buffer of equal dimensions as the original image (i.e. one buffer location per pixel) is needed to store the pixel labels. The buffer is initialised to all zeros, which equates to unlabelled. Scanning from top left to bottom right, the labelling kernel is applied per pixel (pixel position X). This is used to check the labels of neighbouring pixels (pixels A, B, C & D). The kernel shape means only neighbours that have already been labelled will be checked. The process for labelling pixels is described below:
l = 1                              // Initial Label number
for each pixel
  if pixel X is foreground
    if neighbours A,B,C & D are unlabelled (equal to zero)
      label pixel X with l
      increment l
    else
       num = neighbour label A,B,C & D with least value, not including 0
       label pixel X and pixels A, B, C & D if foreground with num
    end if
  end if
done
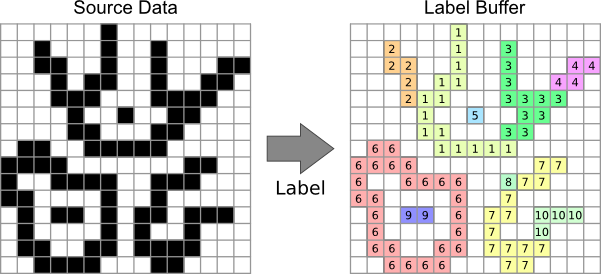
The images below shows an input monochrome image and the result of the labelling process. It is
immediately obvious that the labelling process sometimes gives multiple labels to the same blob. To understand
why this happens, take a look at the blob comprising labels 1, 2, 3 & 4. When the kernel reaches
the first pixel labelled 2, it has no way of knowing at this stage that is is connected to those
labelled 1. However, this is is easily resolved.
The solution is to keep a note which labels refer to the same blob when the two labelled sections eventually connect. This is described in the next section.
Labelling Results
Label Table
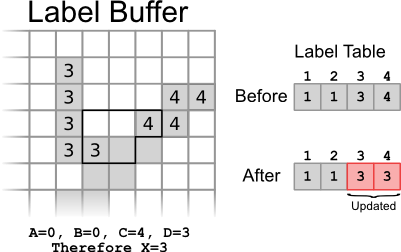
Label Table before and after meeting of blob regions
To deal with the problem of multiple label numbers per blob, it is important to record when two differently labelled sections of a blob meet.
One approach is to create a label table (not to be confused with the label buffer) that links together all the labels within a blob. When a new label number is added to the label buffer, the label table value is initialised to label's number. Subsequently, the label table value is updated with the minimum label within the kernel. The image to the right helps demonstrate this.
The label table before it is updated for the currently kernel position is shown. It can be seen that label number 2 has already been associated with label 1 as they are part of the same blob. The label number for the pixel is calculated, in this case it will be 3. The table value for each label number referenced by the neighbours is then updated with the calculated label number.
The final label table for the reference image is shown below.
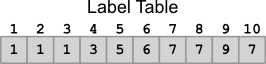
It is easy to extract the labels for each blob from this table. Label 4 is associated with label 1 via label 3.
| Blob | Labels |
|---|---|
| 1 | 1, 2, 3 & 4 |
| 2 | 5 |
| 3 | 6 |
| 4 | 7, 8 & 10 |
| 5 | 9 |
Blob Position and Mass
A similar approach is used to calculate each blob's position, size and mass. The complete algorithm including these calculations is described in the example program source code.
Demo Program and Code
A program using the algorithm described above is linked to below. The blob detection class BlobFinder.java outputs
a list of blobs and will create a colourised version of the original image highlighting the blobs.
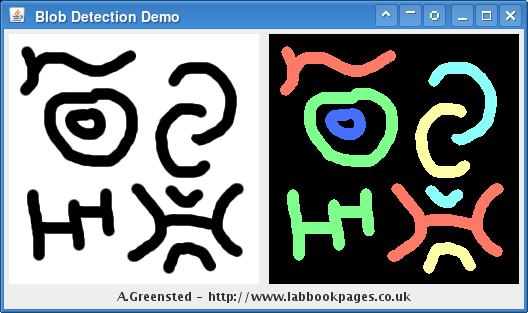
Java blob detection demo program.
The program outputs the minimum and maximum x and y dimensions, as well as the mass (total number of pixels) for each blob found.
Load image: 'img2.png', width: 250, height: 250, num bytes: 187500
Found 9 blobs:
X:  154 ->  206, Y:  208 ->  239, mass:   810
X:   18 ->  105, Y:  154 ->  226, mass:  2496
X:  156 ->  193, Y:  151 ->  173, mass:   490
X:  118 ->  234, Y:  149 ->  227, mass:  2661
X:   56 ->   96, Y:   74 ->  105, mass:   928
X:  146 ->  200, Y:   69 ->  143, mass:  1576
X:   35 ->  128, Y:   54 ->  132, mass:  2853
X:  159 ->  227, Y:   28 ->  111, mass:  1702
X:   11 ->  126, Y:   12 ->   61, mass:  1814
